Preliminary remarks
Application path (Sun Solaris Unix OS): /myApp/myapp111a/
Database location: /myApp/db/test_db
Usually, our workstations have Windows OS and we need to connect to Solaris Unix OS on SSH. That’s why we are using Putty application.
User: root
Password: xxxxxxxxxx
The Samba daemon must be available and activated (in order to support Windows share and map drive).
In this sample, the database is in /myApp/db/test_db path and it’s called, total. Basically, database files name doesn’t change, only the folder name (instead of test_db). In my example, the application port for this database it’s 2540 (might be changed).
Creating empty database and access rights
– Go to the folder that contains the database and create the folder tat contains the new database:
# cd /myApp/db/
# mkdir test_db/
# cd test_db/
– Create the new database called total:
# /progress/dlc/bin/prodb total /progress/dlc/emty8
– Rights assignment for database folder (test_db):
# cd ..
# chown -R myApp:staff test_db/
# cd test_db/
# chmod 644 ./*
– Additionally, we can check database permissions:
# ls -al
Database starting
– Check the open ports, especially database opened ports
# ps -Af | grep mpr
– Start the database using the established port, but an unused port value:
# /progress/dlc/bin/proserve /myApp/baze/test_db/total -S 2540 -N TCP -L 300000
Loading database content
The database and dumps loading process it’s realizing using Database Administration tool, available in Progress’s Windows suite. The suite path it’s: START -> Programs ->PROGRESS -> Data Administration.
Launch this application and select Database menu, Connect option. It will appear Connect Database window and we will complete it as in next image. After that we select OK button.
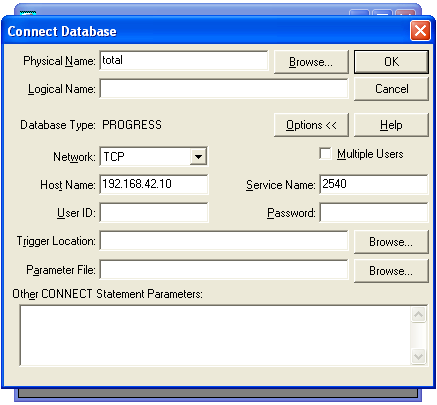
From this capture you can observe the database name, the network protocol (TCP), Progress server’s IP (192.168.42.10) and our opened database port (2540).
Once successfully connected to this database, all the application functionalities will be available for us.
If we want to load the database we access the menu: Admin -> Load Data and Definitions -> Data Definitions (*.df file). We select the table’s definition file from the local disk and select OK button.
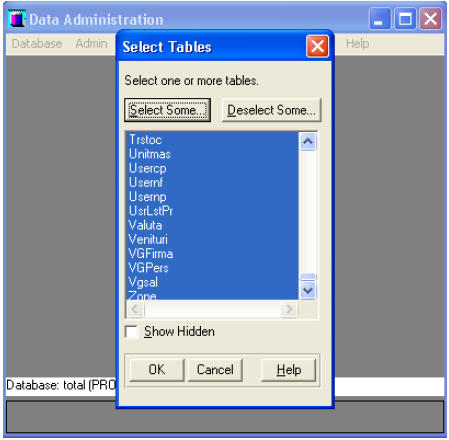
Dumps files stores database information. If we want to load data content then we have to follow Admin -> Load Data and Definitions -> Table Contents (*.d file) path. Select Select Some… button and then select all tables (*), then press OK.
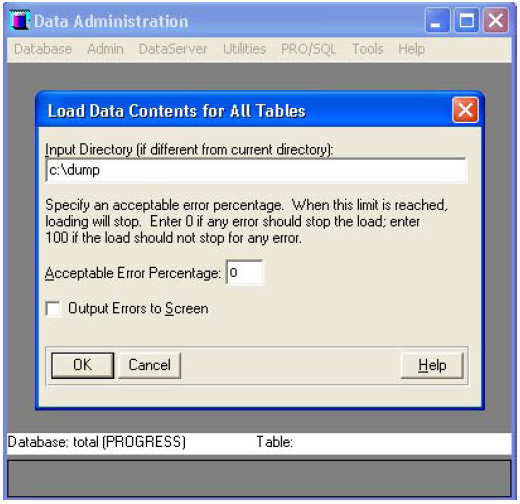
If we press OK button, then we will get a new window where we have to introduce the folder path that contains the dumps data files. Attention! This operation takes time.
Progress database link to myApp
In this step, following last step, we have already the database with structure and content.
– Create a configuration file with .pf extension (ex. mydb.pf) in /myApp/myApp111/Total/Pf/ path:
# cd /myApp/myApp111/Total/Pf/
# cp -p ron.pf mydb.pf
– Edit the new created file using and text editor (ex. vi, pico, mc), changing the first line:
- db total -H 192.168.42.10 -N TCP -S 2521
like this:
- db total -H 192.168.42.10 -N TCP -S 2540
2540 it’s the new port that we will use it for our database.
– The last step, it’s the link creating to our workstation. We create a new desktop shortcut to prowin32 application (\Program Files\PROGRESS\bin\ path) and we change shortcut properties: map a disc drive to the folder that stores total server folder: right click over My Network Places and select Map Network Drive…; select a free drive ( ex. N: ) and in Folder area introduce \\192.168.42.10\myApp111 (my myApp111 folder it’s the path where our application it’s stored) and finally we select Finish button.
Change shortcut properties in order to use our application configuration file.
"\Program Files\PROGRESS\bin\prowin32" -pf \total\pf\mydb.pf"
As you can see, the server Sun path stars from total folder and contains mydb.df file. First file path, it’s not full completed because it uses map drive setting that was applied.
Unix server’s folder myApp111 is the folder that contains that use Progress database.
Create a database backup
In my system, the Unix’s Cron daemon runs every evening a backup script. But, sometimes it’s necessary to save backup in the middle of the day before an admin’s specific task
The steps that you have to follow are:
– Stop current database:
# /progress/dlc/bin/proshut /myApp/baze/test_db/total /by
– Build the backup:
# /progress/dlc/bin/probkup /myApp/baze/test_db/total /myApp/baze/bkupuri/ testdb_10.12.bk
– Restart the database with the specific port (ex. 2540):
# /progress/dlc/bin/proserve /myApp/baze/test_db/total -S 2540 -N TCP -L 300000
Restoring a database backup
My backups location on my server is to /hitachi/backup/ path. Cron’s daemon script generates backups in this location.
The files backup could exist in two ways:
1. .bk extension (ex. ronb2005.12.05.bk) – it means uncompressed backup
2. .gz extension (ex. ronb2005.11.30.bk.gz) – it means compressed backup.
In order to restore a database backup we follow next steps:
– Create a new folder (ex. myrest) in /myApp/baze/ path and copy here the backup that we want to restore (ex. ronb2005.11.30.bk.gz):
#cd /myApp/baze/
#mkdir myrest/
#cd /hitachi/backup/
#ls
#cp ronb2005.11.30.bk.gz /myApp/baze/myrest/
#cd /myApp/baze/myrest/
– If the backup it’s compressed, run restore commands:
# gzip -d ronb2005.11.30.bk.gz ./*
# /progress/dlc/bin/prorest total ronb2005.11.30.bk
– If the backup file it’s uncompressed (1st backup version) then we don’t need gzip command:
# /progress/dlc/bin/prorest total ronb2005.12.05.bk
– Assign rights to database:
# chown -R myApp:staff ./*
# chmod -R 644 ./*
# cd ..
# chmod -R 755 myrest/
# chown myApp:staff myrest/
Then, follow Starting a database procedure.
Stop the database
In order to stop a database we have to follow next steps:
– Check which it the port used by current started database:
# /ps -Af | grep mpr
This it’s an additional step.
– Execute the stop command:
# /progress/dlc/bin/proshut /myApp/baze/test_db/total -S 2540 -N TCP -L 300000
Restart a database
First, when we want to restart a database, we have to check that all the database clients are disconnected.
# /progress/dlc/bin/proshut /myApp/baze/test_db/total
This command shows us if there are connected users and if yes show the user’s name. We have the possibility to force client’s disconnection. We renounce to this action, pressing X key and contact the users in order to disconnect. After a few minutes, we check again that all clients have been disconnected.
– When all the clients are disconnected, we start the brute force command:
# /progress/dlc/bin/proshut /myApp/baze/test_db/total -by
– Run restart command:
# /progress/dlc/bin/proserve /myApp/baze/test_db/total -S 2540 -N TCP -L 300000
Compress/Decompress database
In order to compress a database we have to follow next steps:
– We go to the folder that where the database is saved (ex. /hitachi/backup/):
# cd /hitachi/backup/
– Execute compress command:
#gzip -9 saved_back_up.bk
Then, we wait the process in order to finish. At the end of this command, we will get a
saved_back_up.bk.gz file with a smaller size.
In order to decompress a compressed database, we have to run next command:
# gzip -d saved_back_up.bk.gz
After a successful result of this command, we have the original database backup file saved_back_up.bk. Then follow restoring database procedure.