Category Archives: Miscellaneous

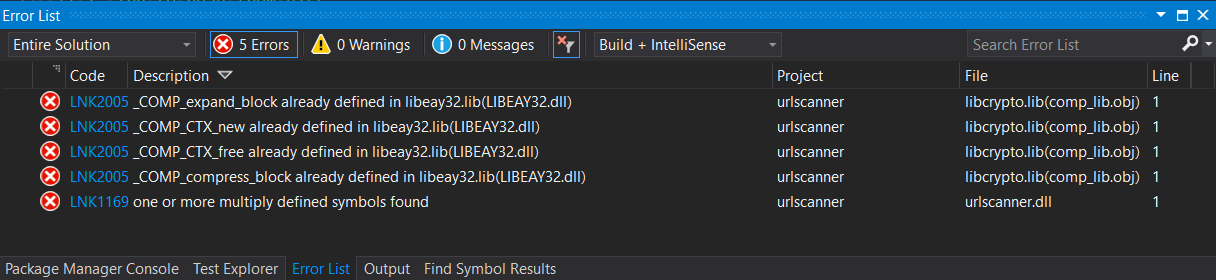
openSSL vs. vcpkg – some strange experiences

One of the projects I was working in the last period uses CURL that uses OpenSSL version 1.1.1.1 in foreground. At some moment in time, for some technical reasons I was tempted to try using the CPPRESTSDK library. But because I had some local NuGet miss-configuration issues in order to have the CPPRESTSDK library build I realized I need to build it myself. But in order to achieve this, I needed the vcpkg tool.

And, because with a quick search I haven’t found the download and the Azure DevOps of this tool for built was down and no Artifacts available, I said: what if I build it myself?

So, I did it… It lasted some time on my laptop but at the end was fine. I had a brand new vcpkg package and I built the cpprestsdk.

Later, returning to my project and integrating the new cpprestsdk library I realized I was started getting new linking errors.

2>Generating   Code...   
2>libcrypto.lib(comp_lib.obj)   : error LNK2005: COMP_CTX_free already defined in libeay32.lib(LIBEAY32.dll)  
2>libcrypto.lib(comp_lib.obj)   : error LNK2005: COMP_CTX_new already defined in libeay32.lib(LIBEAY32.dll)
2>libcrypto.lib(comp_lib.obj)   : error LNK2005: COMP_compress_block already defined in   libeay32.lib(LIBEAY32.dll)  
2>libcrypto.lib(comp_lib.obj)   : error LNK2005: COMP_expand_block already defined in   libeay32.lib(LIBEAY32.dll)   
2>Creating library C:\dev\ my-project\Build\x64\Debug\myproject.lib and object   C:\dev\my-project\Build\x64\Debug\myproject.exp   
2>C:\dev\my-project\Build\x64\Debug\   myproject.dll : fatal error LNK1169: one or more multiply defined symbols   found

Within the sample solution, the situation is even worth. I was able to find out even more compile errors while the vcpkg is installed.

Vcpkg uses OpenSSL to insure secure connection and googling I found out that starting with the OpenSSL 1.1.x Windows version the static LIB and DLL filenames have changed, so depending on local files, it may affect, the former DLL’s libeay32.dll and ssleay32.dll are no longer available.

I double-checked the environment variables, trying to identify paths containing the old libeay32.dll (that was renamed to openssl.dll) and to remove it. I did such investigation, but I found nothing “suspicions”.
The goal was to avoid the names’ collision in case the linker was looking to link “our” openSSL together with LIBEAY32.dll.

The salvation came from GauthamBanasandra’s suggestion. I just ran the next command within the vcpkg repository local folder.

.\vcpkg.exe integrate remove

After the execution of this command, I was able to build back the project as before. And it was fine for me… I don’t need the vcpkg for other proposes right now.
By the way, this command has to be executed within the vcpkg cloning repository folder. Otherwise, you’ll get an error: Could not detect vcpkg-root in case you don’t have an environment variable VCPKG_ROOT pointing to your vcpkg binary repository.

Off-course, in case you still need vcpkg.exe you can reinstall it temporary with vcpkg.exe integrate install. But then, until there is a fix for this situation or a better workaround, you might face the initial problem I had within OpenSSL based projects. So, most probably you will have to call again vcpkg.exe integrate remove.

The issues are created by the fact the actual vcpkg.exe manager is still using the old openSSL library, libeay32.dll.

Until the Vcpkg team didn’t upgrade to a newer OpenSSL library (1.1.x+), we will have to find such workarounds in order to compile different projects. If someone knows other workaround and is open to share, I would not mind mentioning here her/his idea.

The good news is that an upgrade to the OpenSSL 1.1.x is ongoing. The upgrade issue is already open and the pull request #8566 seems advanced in progress. Let’s stay tuned!

psa.exe partial tree sample

Process Status Analysis – the first steps

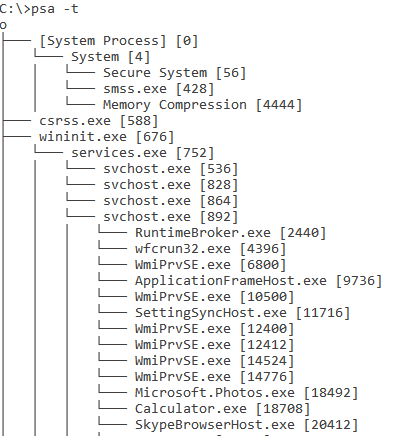
I am pleased to announce my first cross-platform and open source project, the Process Status Analysis tool, available on GitHub.

The Process Status Analysis (psa) version 0.2 is available for Windows and Linux (Debian derived / Ubuntu tested) Operating Systems.
Download: psa for Ubuntu Linux x64 (3582 downloads)
Download: psa for Ubuntu Linux x86 (2833 downloads)
Download: psa.exe for Windows x64 (2812 downloads)
Download: psa.exe for Win32 (2829 downloads)

You may wonder why I did it or what it brings new. Well, I did it for fun, in my spare time and I will continue improving it when I’ll find a time to do it.

The project is written in modern C++ using idioms from the C++ 1x standards. Even if initially was done as a C++ for Windows only, during the past days I managed the port of it for Linux using Visual Studio 2017’s project templates and a connection via SSH.
In general, the source code base is similar, differing just by OS specific stuff.

In case you want to find out more about how to develop C++ Linux projects from the best development tool (imho), Visual Studio, you can find more information on Visual Studio development team blog.

Related to this psa project, the Linux version requires libprocps4-dev library in order to build.

The main reason for starting this project was that I wanted to know what’s the total memory amount used by my Chrome browser. I know it uses a lot of resources, but not that much… 🙂

Even if my preferred processes analysis tool, the Process Hacker offers a lot of processes administration possibilities, but it didn’t provide what I want, so I decided to enjoy a bit.

Chrome processes in Process Hacker

Sample – Google Chrome processes in Process Hacker tool

So, what I achieved by psa.exe was something like:

C:\Windows\system32> psa -o chrome
PID [896] chrome.exe 237.5234 MB
PID [1496] chrome.exe 87.6875 MB
PID [2388] chrome.exe 166.5000 MB
PID [5860] chrome.exe 3.1211 MB
PID [7336] chrome.exe 273.2188 MB
PID [8444] chrome.exe 68.0508 MB
PID [8624] chrome.exe 63.3945 MB
PID [9180] chrome.exe 296.9766 MB
PID [10600] chrome.exe 292.6289 MB
PID [12352] chrome.exe 182.5977 MB
PID [13688] chrome.exe 2.3555 MB
PID [14052] chrome.exe 73.1875 MB
PID [16200] chrome.exe 211.9805 MB
PID [17284] chrome.exe 55.7148 MB
PID [18036] chrome.exe 208.6680 MB
PID [19012] chrome.exe 457.2305 MB
PID [19312] chrome.exe 143.4766 MB
-----------------------------------
Total used memory: 2824.31 MB

A bit too much in my humble opinion…
The features this tool offers includes:

Get all processes loaded in memory information

I case you want to have a snapshot of all the processes loaded in the OS’s memory you can have it with.

psa -a

Get process only used memory

With psa.exe you can reach the used memory by a specific parameter -o after the process name or at least a part of its name.

psa -o chrome             // find how much memory uses your Chrome!   o_O

Currently, there is no string replace ‘*’ but it’s ongoing.


Print processes tree

Storing the processes’ data within a generic tree done by me, I took the decision to print the processes’ tree output, similarly there is in Windows with tree.exe tool or on Linux in pstree or even htop.

./psa -t
./psa -t 1034

psa.exe partial tree sample

Process Status Analysis partial tree of Windows process

Top most “expensive” processes

In case you want to see what are the most expensive processes within your operating system, you can achieve it with:

psa -e 20

or simpler psa -e in case you’re sure you want top 10 expensive processes (the default value).

silviu@ubuntu-dev-server:~/projects/psa-lin/bin/x64/Release$ ./psa -e
Top 10 consuming memory processes
-------------------------------------------
PID        Process Name         RAM Usage
-------------------------------------------
[924]    /usr/lib/policykit-1/polkitd   270.68 MB
[906]    /usr/lib/accountsservice/accounts-daemon       269.43 MB
[842]    /usr/sbin/rsyslogd     250.39 MB
[878]    /usr/lib/snapd/snapd   197.29 MB
[531]    /lib/systemd/systemd-timesyncd         97.97 MB
[1614]    sshd: silviu@pts/0    93.16 MB
[1576]    sshd: silviu [priv]   93.16 MB
[863]    /usr/bin/lxcfs         93.13 MB
[427]    /sbin/lvmetad          92.55 MB
[1034]    /usr/sbin/sshd        63.98 MB
-------------------------------------------


C:\Windows\system32> psa -e 10
Top 10 consuming memory processes
-------------------------------------------
PID        Process Name         RAM Usage
-------------------------------------------
[19012]    chrome.exe           435.67 MB
[17684]    chrome.exe           329.51 MB
[7336]    chrome.exe            259.61 MB
[15576]    devenv.exe           248.20 MB
[896]    chrome.exe             222.85 MB
[2388]    chrome.exe            188.21 MB
[18428]    chrome.exe           184.48 MB
[15760]    chrome.exe           173.82 MB
[488]    Dropbox.exe            162.15 MB
[5488]    googledrivesync.exe   161.11 MB
-------------------------------------------
Total used memory: 2365.61 MB

Redirect output to a file

From the standard output the information can be easily redirected to a file.

c:\> psa -t > windows_processes_tree.txt
# ./psa -t > linux_processes_tree.txt        

Kill process feature

This feature was not implemented yet but in case we need it we can be done it easily with the existing tools on the target OS (ex. Task Manager, Process Exporer/Hacker, pskill.exe for Windows or the combination ps + kill on LInux).

Feedbacks and improvements
Any constructive feedback, suggestions, contributions to improvements are appreciated.
Feel free to add any issue you find, wish or suggestion you have in the GitHub repository, the 
Issues section or here as a comment.

Experiences with Adobe Acrobat/Reader Plug-ins

box_adobe_150x150I wrote this document after a challenging experience I had recently within an Adobe Acrobat/Reader plugin creation. Even if the Adobe’s SDK it’s nicely documented within PDF files, one of the major reason that determined me to write this article was the frustration I got sometimes when, for instance, trying to see “why the plugin was not loading into Acrobat/Reader” and the Google’s engine provided me a lot of references such “why the Reader plugin is not loading into a browser”. Also, the search functionality from Adobe’s forum didn’t help me too much. I hope to help others by clarifying some challenges might meet a developer at begin of creation such kind of plugin.
Adobe has two products for .PDFs file handling: the freeware Reader capable of reading only and the Acrobat for reading and one that supports effective .PDFs creation, Adobe Acrobat. Both Acrobat and Reader use the same SDK but the Reader APIs is a subset of those available for Acrobat (obvious).
There are three types of plugins: regular plugins, reader-enabled plug-ins and certified plug-ins.

General considerations

Plug-ins for Acrobat can be developed and distributed freely and no license is required from Adobe. The payment exception appears in case of DRM agreement which includes a $50,000 annual fee and a 5.5% revenue royalty. Adobe considers to apply digital rights management (DRM) in case the developed plugins functionality invoke “encrypting a PDF file or controlling access to a PDF file, then it is DRM. Also, if you add any functionality to the security settings of Adobe Acrobat (…). If your plug-in is required for someone to access the PDF file, then we would consider it to have DRM functionality”.

Only plug-ins that are shipped as part of Acrobat and Reader can be ‘certified’. This is so that if users wish to run Acrobat or Reader without any 3rd party plug-ins, they can do this easily by using the ‘Certified plug-ins only’ checkbox in the preferences.

Adobe maintains a registry of four-character prefixes for each company that develops extensions for its own products. The new companies that intend to develop such plugins should contact Acrobat Developer Support to obtain a four-character prefix to be used. Adobe’s prefix is ADBE or ACRO. This prefix is needed to be used with various elements as well as private data that it writes into PDF documents.

CropMenu = AVMenuNew(SuperCrop, "ADBE:SuperCropMenu", gExtensionID);

For Adobe Reader the plugin needs a special macro to be defined by project settings READER_PLUGIN. By defining it it’s easy to identify in case you’re calling an Acrobat only specific SDK function because it causes compiler errors.

The First challenges

After downloading the SDK the first instinct was trying the project samples. Once with this step appeared the first annoying situation: I loaded all.sln solution into Visual Studio I have been observed that whatever project I built and deployed into the Reader “plug_ins” subfolder I was not able to see them in Adobe Reader. The “plug_ins” subfolder or one more subfolder level down is the place you have to deploy the built plugins. These plugins are DLLs with an .API extension. The confusion has amplified because by downloading and installing the FileOpen WebPublisher Client plugin I observed that the plugin was running perfectly and I saw it even into Help – Adobe Third Part Plug-ins menu.

But deploying such plugins in the Adobe Acrobat “plug_ins” folder was up and running. I started reading the Developing Plug-ins and Application for Adobe Reader I followed the “why a plug-in might not load” founded steps but no solution for Acrobat Reader. Just in case I unchecked the “Use only certified plug-ins” Reader’s setting and nothing (‘Certified plug-ins only’ = Edit > Preference: Application Startup: Use only certified plug-ins (unchecked)).

Trying to debug over the plugin source code by attaching to Reader project or by starting the debug with Reader application didn’t help me more.

Later, after some challenges, I found out that the key point of understanding why the SDK sample DLLs were not loading into Adobe Reader it was that the plugins for Reader need to be signed before being deployed into “\Program Files\Adobe\Acrobat\plug_ins” directory. Such information is not present into that “why is not loadingmanual list.

How to sign the plug-in for Adobe Reader

As I mentioned earlier the plug-in in Reader must be signed by using a certificate provided by Adobe. It is highly recommended that you make the application for a key at the beginning of the development process since the application can be denied in case the plugin functionality is not in accordance with Adobe’s business goals. Also, this ensures that your agreement is in place when you are ready to build the Reader version of the plug-in. If the key is approved, the developer must build public key and pair key files using a tool in the Acrobat SDK.

In the moment somebody wants to develop a plug-in for Acrobat Reader has to fulfill an integration form, not before creating an Adobe ID. According to Adobe the approval process might take some time (up to two weeks). The application should be filled out completely and your responses will be used to determine your eligibility. If you are building a DRM-based Adobe Reader plug-in, we recommend you send an email to with details of your request so that we can guide you through the application process.

Generates the public and private pair keys by the Makekeys tool:

MakeKeys -kp MyPlugIn.Pair.key -pk MyPlugIn.Public.Key YourGenericKey

The size of the public key should be 98 bytes. The size of the public and private key pair should be 451 bytes. The size of the returned encrypted key should be 554 bytes. Save this .key generated files into a proper location cause later might be useful including it into your project.This tool is located into your SDK: ex. sdk110_v1\PluginSupport\Tools\Reader-enabling Tools\win.

Submit the new created Public Key file and the fulfilled form document to and wait to get the digital certificate. This will be a RIKLA-DigCert.rc file.  In case you will receive approval from Adobe there are several more steps you need to follow to receive your Reader Integrated Key for your plug-in. The Key arrives as a digital certificate. Once this is done the plug-in will load into Reader. Note that if the plug-in is recompiled the plug-in must again be signed (the same certificate and key-pair files can be used).

Once you get the digital certificate file, you should sign the fresh built plugin, before deploying it into Reader’s plug_ins folder.

Here, because of using SDK 11 I got some confusion because of the steps described in the “enabling the plug-in for Acrobat Reader” section, according to apps documentation guide. They are talking about Makecmd32.exe tool, some API_ENCRYPTED_GIGEST and API_DIGITAL_CERTIFATE IDs, etc. But the SDK 11 has no Makemd32.exe tool coming with. This tool can be downloaded within other RIKLATools.zip file but I preferred following the actual SDK 11 documentation especially because it has another signing approach. Instead of Makemd32.exe I had to use SignPlugin.exe (into SDK docs: Plug-ins and Applications > Developing Plug-ins and Applications > Creating an Adobe Reader Plug-In > Developing and enabling an Adobe Reader plug-in > Enabling the plug-in for Adobe Reader).

..\MySources\MyPlugIn\keys>SignPlugin -kp MyPlugIn.Pair.key -cf RIKLA-DigCert.rc
"C:\Program Files (x86)\Adobe\Reader 10.0\Reader\plug_ins"\MyPlugIn.api

Plug-In Structure

The Acrobat/Reader applications have few steps approach for plugins: initialization + plugin, handshaking, exporting and importing HFTs and unloading the plugin, implemented as callbacks. A minimum operation that a plug-in must implement is PluginInit() callback function.

The plugin life cycle into Adobe Acrobat/Reader invokes next steps:

  • At startup search into its plugin directory (plug_ins). It looks in the .API files for the exported PlugInMain, it loads the plugin by invoking the LoadLibrary and call the function pointed by the symbol of PlugInMain.
  • For each detected plugin (.API) it attempts loading the file. If the plugin is successfully loaded the Reader/Acrobat invokes routines from PIMain.c and completes the handshaking process.
  • Invokes callbacks in the next order:

PIHandshake

PluginExportHFTs

PluginImportReplaceAndRegister

PluginInit

  • Before closing Reader/Acrobat the PluginUnload callback function it’s executed. That’s the proper place to release the allocated resources.

In the initialization phase, the plugin hooks into Acrobat’s user interface by adding menu items, toolbars, etc. The unload procedure should free any memory the plug-in allocated and remove any user interface changes it made.

Handshaking is also one of most important step. The application performs checking with each plugin before opening it. It is the step where a plugin for Adobe Reader it is tested before loading. During this operation the plug-in specifies the name, some initialization procedures, signature test and optional an unload procedure if is needed. In case the signed test fails the loading process of that plugin is stopping.

How to create a plugin

Even if the Acrobat SDK allows creating plug-ins for OS platforms out of Windows (MAC, Unix/Linux) without too many differences (most because of configuration and used tools), I will describe down some details for plugin development on Windows platform.

Download the latest Acrobat SDK and unzip in a preferred location. Create an environment variable for AcroSDKPIDir that contained the SDK content.

$(AcroSDKPIDir) = D:\work\adobe\acrobat\SDK110_v1

Running Visual Studio “as administrator” it’s a good idea in order to be able to succeed the write into Adobe’s plug_ins folder. In order to establish an easier debug and deploy process, I preferred to add two additional environment variable AcroPluginsDir containing the Acrobat plugins files and ReaderPluginsDir for Reader plugins files.

AcroPluginsDir = C:\Program Files (x86)\Adobe\Acrobat 11.0\Acrobat\plug_ins
ReaderPluginsDir = C:\Program Files (x86)\Adobe\Reader 10.0\Reader\plug_ins

Having these environment variable set into your OS you can start the effective plugin creation.

According to Acrobat SDK you can start from an existing sample so-called Starter project or you can start from an empty DLL project. The first version allows you having a fast up and running own plugin by just adjusting the files name and starting to apply the business logic.

In case you choose the clean approach you need to add paths to the SDK header files into C/C++ > General > Additional Include Directories as for instance:

..\..\..\Arch\Adobe\Acrobat\SDK110_v1\API
..\..\..\Arch\Adobe\Acrobat\SDK110_v1\SDK

This will be needed for instance to easily include “PIHeaders.h” file.
Add next preprocessors definitions into project settings: WIN_PLATFORM, WIN_ENV and READER_PLUGIN (C/C++ > Preprocessor > Preprocessor Definitions).
Include PIMain.c file into your project. This file is located into your Acrobat SDK path. In my case it is:

..\..\..\Arch\Adobe\Acrobat\SDK110_v1\API\PIMain.c

Add the standard Acrobat callbacks functions prototype into other .cpp file (functions invoked into plugin structure topic) and start the business logic implementation. Here you can inspire from the content of StarterInit.cpp file (Starter sample project). In case you want to add some menu, toolbar or other UI items these should be added into PluginInit() function.

The PlugInMain() function is the entry point into such plugins and it’s needed to add the export flag to PlugInMain() function via project settings:

Linker > All Options > Additional Options the next command: /EXPORT:PlugInMain %(AdditionalOptions).

Without this setting, you will get a big surprise even if at the very first point of view the built plugin is signed and the DllMain() is accessed into a debugging flow. But none of the callbacks functions without this export.

In order to automatize the process for plugin build and deployment you might be added some Post Build Event commands:

copy $(Configuration)\MyPlugIn.api "$(AcroPluginsDir)"
copy $(Configuration)\MyPlugIn.api "$(ReaderPluginsDir)"
SignPlugin -kp keys\MyPlugin.Pair.key -cf keys\RIKLA-DigCert.rc "%ReaderPluginsDir%"\MyPlugIn.api

Conclusions: In my opinion, the Acrobat SDK it’s nicely designed but even if there are a lot of PDF references, somehow it doesn’t have the best online structured content, causing users to waste enough time to match all the pieces. Maybe because of complexity and flexibility that exposes it’s not very easy to find complete clean references.