Category Archives: Software

Ubuntu – How to fix update errors for a server behind of a proxy

If you’re behind of a proxy server and the IP address has changed (or proxy it’s a new node in your network topology) then probably when you’re trying to update your binaries then you’ll get a list of errors.

W: Failed to fetch http://security.ubuntu.com/ubuntu/dists/oneiric-security/multiverse/i18n/Translation-en_US Unable to connect to 192.168.120.240:3128:
W: Failed to fetch http://security.ubuntu.com/ubuntu/dists/oneiric-security/multiverse/i18n/Translation-en Unable to connect to 192.168.120.240:3128: 
W: Failed to fetch http://security.ubuntu.com/ubuntu/dists/oneiric-security/restricted/i18n/Translation-en_US Unable to connect to 192.168.120.240:3128: 
W: Failed to fetch http://security.ubuntu.com/ubuntu/dists/oneiric-security/restricted/i18n/Translation-en Unable to connect to 192.168.120.240:3128:

This happens because you’re unable to connect to Ubuntu mirrors. In order to fix this issue, you have to edit apt.conf file settings.
– Check the proxy settings in apt.conf file:

my-user@my-server:/#sudo -s
root@my-server:/# view /etc/apt/apt.conf

– Update the new proxy IP and port (ex. http://192.168.230.99:3128):

root@my-server:/# vi /etc/apt/apt.conf
Acquire::http::Proxy "http://192.168.230.99:3128";

If you need user and password for logging to the Proxy server this can be achieved in most cases by using the following layout:

Acquire::http::Proxy "http://username:password@your_proxy_address:proxy_port";

– Finally, you may enjoy running the update commands:

root@my-server:/# apt-get update
root@my-server:/# apt-get upgrade

Simple Pictures Unifier 1.1 application is up!

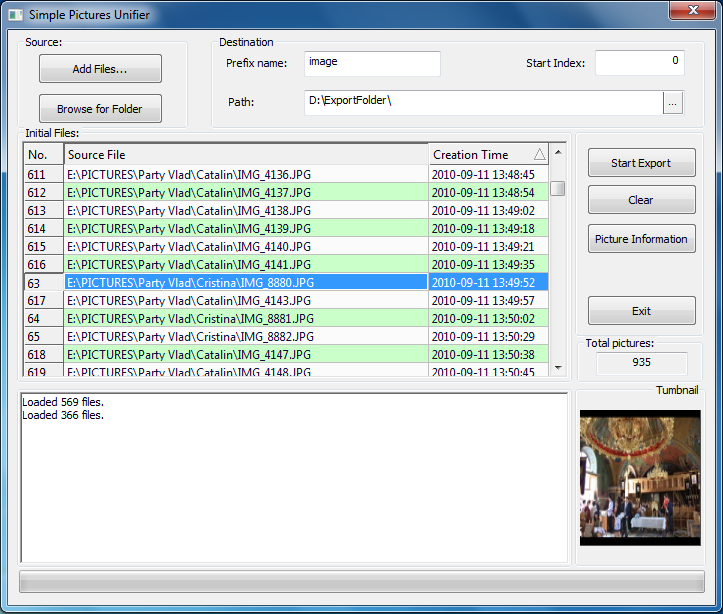
At the beginning of this year, I have launched an application that helps you to organize the pictures of your important moments. The application helps you especially if you have photos from different sources (different cameras of friends) and you want to have a fluent images story.

From the moment I have launched the first release until now I made up to 12GB pictures (3200+ pictures of 10 MB) and honestly I never found time in order to organize the pictures. Always I said that I will complete my application and finally I found time to implement export by date time folders and so on.

Simple Pictures Unifier 1.1 allows merging and exporting pictures in one folder or in date time folders. The application comes with a better user-friendly experience and few internal improvements.
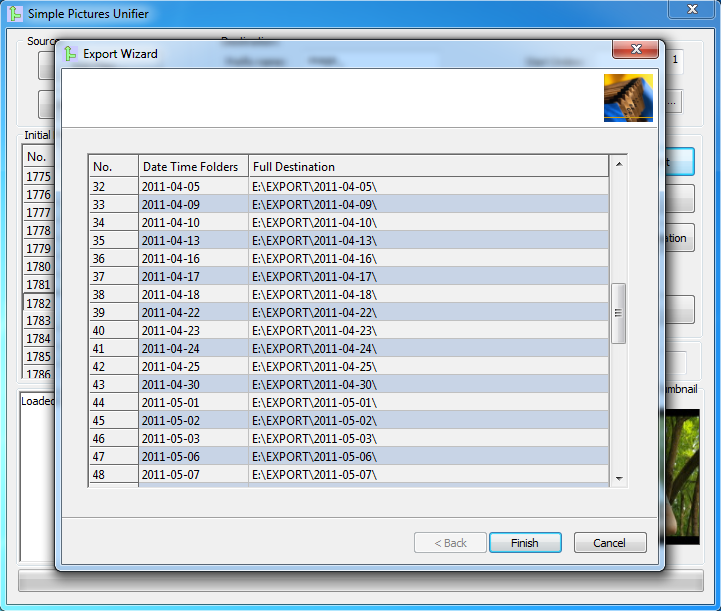
The Start Export button launched a new wizard dialog that allows the selection of the preferred export method.

Export Wizard dialog

If the user chooses the default export to date time folders the Export wizard window shows a list with detected time folders.

Selecting Finish button the pictures merging is realized and the files are copied to the destination folders. If the user wants to abort the export process it can just press Stop button or close the application with now damages.

Feel free to add comments, suggestions or bugs reports. Any constructive feedback is sincerely appreciated.

Adventures with _chkstk

Called by the compiler when you have more than one page of local variables in your function.
_chkstk Routine is a helper routine for the C compiler. For x86 compilers, _chkstk Routine is called when the local variables exceed 4K bytes; for x64 compilers, it is 8K.

That’s all that you get from _chkstk()’s msdn web page. Nothing more…

Overview
A process starts with a fixed stack space. The top of a stack is pointed to by the ESP register (Extended Stack Pointer) and this is a decrementing pointer. Every function calls results in a stack created for the function inside this Process Stack. Every thread function has its own stack. The stack is a downward growing array. When a function starts, the default stack reservation size is 1 MB.
This is contrasting with the heap’s size, whether theoretically increases to a limit of 4 GB on 32bits OS. See more information here.

Every thread under Windows gets its own block of contiguous memory, and while function calls are made, the stack pointer is increasing and decreasing. In contrast, a different thread within the same process might get a different block of contiguous memory – its own stack. When a context switch occurs, the current thread’s ESP (along with the IP and other registers) are saved in the thread’s context structure, and restored when the thread is activated the next time.
To specify a different default stack reservation size for all threads and fibers, use the STACKSIZE statement in the module definition (.def) file. To change the initially committed stack space, use the dwStackSize parameter of the CreateThread, CreateRemoteThread, or CreateFiber function.
Most stack problems occur in overflows of existing stacks, as their sizes are fixed and they cannot be expanded.

_chkstk() increases the stack when needed by committing some of the pages previously reserved for the stack. If there is no more physical memory available for committed pages, _chkstk fails. When you enter a function (VC++ with the stack checking enabled), it will call the _chkstk located in CHKSTK.ASM. This function does a stack page probing and causes the necessary pages of memory to be allocated using the guard page scheme, if possible. In this function, it is stated that when it encounters _XCPT_GUARD_PAGE_VIOLATION, the OS will attempt to allocate another guarded page and if it encounters _XCPT_UNABLE_TO_GROW_STACK then it’s a stack overflow error. When _XCPT_UNABLE_TO_GROW_STACK is encountered, the stack is not yet set up properly, that is why, that it will not call the catch because calling it will use invalid stack variables which will again cause another exception.

Case – Too many or too big variables on stack
As I said on top, the function stack size is 1 MB. If you miss that and you’re trying to define and use internally an array like this:

int arr[4000][200];

When you’ll compile with VC++ compiler in debug mode, you will have a big surprise: the application is crashing on _chkstk() at the moment the _chkstk() tries to create new memory page on stack and fails.
The output window shows next message:
First-chance exception at 0x004116e7 in testApp.exe: 0xC00000FD: Stack overflow.
Unhandled exception at 0x004116e7 in testApp.exe: 0xC00000FD: Stack overflow.

This happens because the 1MB limit is overloaded even on a win32 OS: 4000*200*4 = 3.2MB (approx.).
Same story if you define many local variables and their stack usage overloads the 1MB limit. Off-course the thread stack size can be changed but think once again if it is really needed to do that.
If you really need this big array, then the best solution to avoid this crash is using the heap.

int **arr = new int*[4000];
for(int i=0; i<4000; ++i) {
  arr[i] = new int[200];
}

// and finally don't forget to delete
for(int i=0;i<4000; ++i) {
  delete[] arr[i];
}
delete[] arr;

Case – Recursive functions
If you have an infinite recursion, then you will gate the same stack overflow error and the application crashes in _chkstk.asm. Recursive function is not the subject of this article so I don’t go in deep… Here it is a good example of what happens with recursive functions.
The solution is to avoid using recursive functions as much as possible and try to implement an iterative function.

Case – A stack corruption
I have started looking over _chkstk() function at the moment when I got few bugs with crashes with some similarly details. I had to analyze some .dump files and solve a few bugs that contained a call stack with _chkstk() on top.
Most of the .dump files call stack contained a second similarly thing: the call of a thread function (so called ThreadFoo()) that was running in a thread’s pool.
At that moment I started to research why _chkstk() fails and my first track was to debug the stack overflows. I followed a MSDN debugging tutorial and unfortunately I didn’t find something strange. I checked if the local stack variables are not so big in order to fill the ThreadFoo() function’s stack, and it did not.
Then a new study of ThreadFoo() function has followed in order to detect the internal functions calls that can fail in some circumstances. I stopped to some trace function calls and I studied deeply. Those trace functions were defined in an external debug class and each time when a new trace file was added it used an internal buffer (TCHAR szBuff[2048] = _T(“”);).
The writing of this buffer was done using: swprintf(). As we know, this function is unsafe and is not recommended to use. As long as the content of these trace lines was dynamically build (in some cases those line may contain even dynamically build SQL queries that failed) then the length of these trace lines could be higher than 2048 bytes and then guess what: a stack corruption appears! UPS! The stack pointer will be corrupted (the classic stack overflow case).

So I have implemented and used the next macros:

#if defined(UNICODE) || defined(_UNICODE)
#define usprintf(x, ...) \
   _snwprintf(x, _countof(x)-1, ##__VA_ARGS__); \
   x[_countof(x)-1] = 0
#else
#define usprintf(x, ...) \
   _snprintf(x, _countof(x)-1, ##__VA_ARGS__); \
   x[_countof(x)-1] = 0
#endif

Now, if we’re using the safe macro we will have no issues.

int x = 23;
TCHAR szMsg[2048] = {0};
usprintf(szMsg, L"Error: %d", x);

A safety alternative way to that buffer was the heap using but the heap access is not fast as the stack access, so I preferred this approach (in a business application every millisecond’s matters for the log system).
After that fixed, I met no other stack corruptions in ThreadFoo() and other code areas.

Even if the top of the call stack was _chkstk() this was not the function that failed. The error appeared because of that stack corruption and _chkstk() has just detected.

Conclusion
If your code produces a stack overflow, then you have to rethink your design in right away:

  • If you see _chkstk() on the top of call stack, check if you have no stack corruptions – stack overflow.
  • Don’t try to manipulate the stack by yourself. The default 1MB stack size is basically enough
  • Allocate dynamically if you’re using big arrays
  • If you have recursive functions producing a stack overflow, re-write them using loops (a tip: it is a proven fact that any recursive functions can be programmed non-recursive)

References
Set stack size
Thread Stack Size
_chkstk Routine
Stack (data structure)
Debugging a Stack Overflow – tutorial
Visual C++ apps crashing in _chkstk() under load
Optimization Note (C++) 1: push, pop, call _chkstk
What is Recursion?

pre vs. post increment operator – benchmark

Compiler: Visual C++ 2010
Operating System: Windows 7 32bits
Tested machine CPU: Intel core i3
Download: preVSpost (demo project) (1869 downloads)

A recent Visual C++ team’s comment on twitter.com reminded me a hot topic that exists in C++ programming world: there is a long discussion of using pre versus post increment operators, specially, for iterators. Even me I was witness to a discussion like this. The discussion started from a FAQ written by me on www.codexpert.ro.

The reason of preferring pre increment operators is simple. For each post-increment operator a temporary object is needed.
Visual C++ STL implementation looks similarly with next code:
[cpp]
_Myt_iter operator++(int)
{ // postincrement
_Myt_iter _Tmp = *this;
++*this;
return (_Tmp);
}
[/cpp]
But for pre-increment operator implementation this temporary object is not needed anymore.
[cpp]
_Myt_iter& operator++()
{ // preincrement
++(*(_Mybase_iter *)this);
return (*this);
}
[/cpp]

In the discussion that I mentioned above, somebody came with a dummy application and tried to prove that things have changed because of new compilers optimizations (the code exists in the attached file, too). This sample is too simple and far away to the real code. Normally the real code has more code line codes that eat CPU time even if you’re compiling with /O2 settings (is obviously).
Base on that VC++ team’s tweet related to viva64.com’s research I decided to create my own benchmark base on single and multicore architectures. For those that don’t know Viva64 is a company specialized on Static Code Analysis.
Starting from their project I extended the tested for other STL containers: std::vector, std::list, std::map, and std::unordered_map (VC++ 2010 hash table implementation).
For parallel core tests I used Microsoft’s new technology called Parallel Pattern Library.

1. How the tests were made
1.1. Code stuff
In order to get execution time I used same timer as Viva64 team (with few changes). Each container instance was populated with 100000 elements of same random data. An effective computing function was repeated 10 times. Into this function some template functions are called for 300 times. The single core computing function contains loops like this:
[cpp]
for (size_t i = 0; i != Count; ++i)
{
x += FooPre(arr);
}

// where FooPre looks like
template
size_t FooPre(const T &arr)
{
size_t sum = 0;

for (auto it = arr.begin(); it != arr.end(); ++it)
sum += *it;

return sum;
}
[/cpp]

For the parallel core computing the first simple for loop has changed in:
[cpp]
parallel_for (size_t(0), Count,
[&cnt,&arr] (size_t i) {
cnt.local() += FooPre(arr);
});[/cpp]
Where cnt is an instance of combinable class and the sum of partial computed elements is obtained by calling combine() method:
[cpp]cnt.combine(plus());[/cpp]
As you can see, the parallel_for function uses one of the new C++ standard features: a lambda function. This lambda function and the combinable class implements the so called parallel aggregation pattern and helps you to avoid the multithreaded common share resource issues. The code is executed on independent tasks. The reason that this approach is fast is that there is very little need for synchronization operations. Calculating the per-task local results uses no shared variables, and therefore requires no locks. The combine operation is a separate sequential step and also does not require locks.

1.2. Effective results
The tests were running on a Intel core i3 machine (4 cores) running Windows 7 on 32bits OS. I tested debug and release mode for single and multi cores computation. The test application was build in VC++ 2010 one of the first C++11 compliant.
The OX axis represents the execution repeated times, and the OY axis means time in seconds.

1.2.1. Single core computation
Debug

Release

1.2.2. Multi cores computation
As you know, multi core programming is the future. For C++ programmers Microsoft propose a very interesting library called Parallel Pattern Library.
The overall goal is to decompose the problem into independent tasks that do not share data, while providing a sufficient number of tasks to occupy the number of cores available.

This is how it looks my task manager when the demo application runs in parallel mode.

Isn’t it nice comparing to a single core use? 🙂

Debug

Release

1.2.3. Speedup
Speedup is an efficiency performance metric for a parallel algorithm comparing to a serial algorithm.

Debug

Release

Conclusions:
The biggest differences appear in the debugging area where the pre-increment is “the champion”.
With primitive types (like int and pointers), the opposite might be true, because of the pipe-lining that a CPU does. With post-increment, due to optimizations in release there is no copy to be returned for these simple types.
According to these results I have to agree with Viva64 team. Even if the results are so close in release version I keep my opinion that using pre increment operator is preferred instead of post increment operators. We all know how long it takes the debug period and how important is every second that we win in long debugging days.
If you still have doubts in using pre-increment operator or you need a flexible way of switching this operators in your code you can easily implement some macros like these:

#define VECTOR_ITERATOR(type, var_iter) std::vector::iterator var_iter;
#define VECTOR_FOR(vect, var_iter) for (var_iter = vect.begin(); var_iter != vect.end(); ++var_iter)

Numeric type conversion to std::string and vice versa

In our real applications we have to convert from strings to integer or to real variables and vice versa (double/float/int variable to std::string).
We can realize these conversions using C style CRT function or we can try C++ approach via STL.
Unfortunately, current C standard libraries do not offer a complete support for any type of conversion. For instance, if we try to put an integer into a C++ string object (std::(w)string) using a well known function itoa() then we get next error:

int x1 = 230;
std::string s1;
itoa(x1, s1, 10);

// error C2664: ‘itoa’ : cannot convert parameter 2 from ‘std::string’ to ‘char *’

A C style approach in order to avoid this error means using an intermediary buffer:

int x1 = 230;
std::string s1;
char szBuff[64]={0};
itoa(x1, szBuff, 10);
s1 = szBuff;

Same story if we try to convert a std::string to an int:

std::string s3 = "442";
int x3 = atoi(s3);

// error C2664: ‘atoi’ : cannot convert parameter 1 from ‘std::string’ to ‘const char *’

In this case we can use c_str() in order to return a constant pointer to char.

int x3 = atoi(s3.c_str());

An elegant way to get rid of such problems is to build two conversion function that use templates and C++ streams.
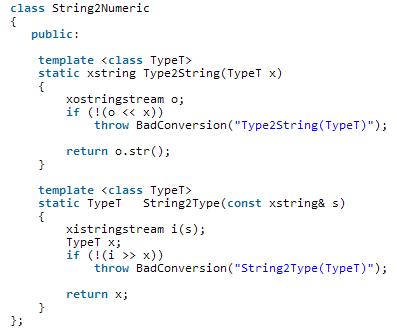
Base on this idea, I created a Sting2Numeric class that contains two static methods: Type2String() and String2Type().
where BadConvertion is a std::runtime_error‘s derived class.


class BadConversion : public std::runtime_error {
public:
  BadConversion(const std::string& s)
    : std::runtime_error(s) { }
};

class String2Numeric{
public:
 template
 static xstring Type2String(TypeT x) {
   xostringstream o;
   if (!(o << x)) 
throw BadConversion("Type2String(TypeT)");
return o.str();
}

template static TypeT String2Type(const xstring& s) { xistringstream i(s); TypeT x; if (!(i >> x)) throw BadConversion("String2Type(TypeT)"); return x; } };


Because of ANSI and UNICODE project’s compatibility I defined few macros:


#ifdef _UNICODE
#define xstring std::wstring
#define xostringstream std::wostringstream
#define xistringstream std::wistringstream
#else
#define xstring std::string
#define xostringstream std::ostringstream
#define xistringstream std::istringstream
#endif

Because of this compatibility I strongly recommend using a xstring alias instead of std::wstring or std::string.
When you want to convert an int, float, double, or other numerical type to a xstring in a C++ style you can use the Type2String() function. Vice versa, if you want to convert a xstring to these types you can use String2Type().

In order to avoid possible thrown exception I recommend to you using a try catch block whenever you’re using these functions. I prefer using xstring for string/wstring variables definition, too.
Here is a sample of using this class:

double y1 = 0.2312, y2 = 1.0123;
xstring s1 , s2;
try {
s1 = String2Numeric::Type2String(y1);
s2 = String2Numeric::Type2String(x2);
#ifdef _UNICODE
xstring s3(L"43.52");
#else
xstring s3("43.52");
#endif
x2 = String2Numeric::String2Type(s3);
y2 = String2Numeric::String2Type(s3);
} catch (BadConversion &eBC) {
std::cout << "An exception has been thrown: " << eBC.what() << std::endl;
}

The String2Numeric class can be extended. For instance, if the conversion throw an error then you can add detailed information in the exception message.

Download String2Numeric (1701 downloads) class.

Flexible changes for product version properties – Visual C++ binaries

Manually editing of binary files version in the resource editor of Visual Studio IDE is not a viable solution. If we have dozens of projects in our solution, then for each kit building we should need manual resources file edit. Otherwise, we can use a special tool that does this thing for us.
Unfortunately this approach is not the most flexible and could fail.

For our flexible binaries properties changes and in order to avoid manual edit for each rebuild we can create and include a header file (version.h) that contains some constants of product version and file version of our project (.rc files).

#define PRODUCT_VERSION 4.3.2.198
#define PRODUCT_VERSION_STR "4.3.2.198"

Then, for each .rc file wherever we have FileVersion and ProductVersion we have to use this constants.
When we will build a new kit, we have to change only these constants and then to start the kit building process. Everything is fine until we add new controls in our projects resource files. Then, because of Visual Studio IDE automation we can get an unlikely surprise: the FileVersion and the ProductVersion properties could be reset to 1.0.0.0.

In order to avoid this issue and edit the version only in a single place I propose the following workaround:

  • Create a version.h header file that have to contain these constants only (as on top). I should recommend to create it into the root solution in order of being easy included in all the projects.
  • Include this file in the project you need to use.
  • Use a text editor (ex. notepad.exe) and include next code section at the end of .rc2 resource file of your project (res\your_project.rc2) – this section contains the include version.h file section, too.
// Neutral resources
#if !defined(AFX_RESOURCE_DLL) || defined(AFX_TARG_NEU)
#ifdef _WIN32
LANGUAGE LANG_NEUTRAL, SUBLANG_NEUTRAL
#pragma code_page(1252)
#endif //_WIN32
/////////////////////////////////////////////////////////////////////////////
// Versio
//
#include "..\version.h"
VS_VERSION_INFO VERSIONINFO
FILEVERSION PRODUCT_VERSION
PRODUCTVERSION PRODUCT_VERSION
FILEFLAGSMASK 0x3fL
#ifdef _DEBUG
FILEFLAGS 0x1L
#else
FILEFLAGS 0x0L
#endif
FILEOS 0x4L
FILETYPE 0x1L
FILESUBTYPE 0x0
BEGIN
BLOCK "StringFileInfo"
BEGIN
BLOCK "040904e4"
BEGIN
VALUE "CompanyName", "TODO: "
VALUE "FileDescription", "TODO: "
VALUE "FileVersion", PRODUCT_VERSION_STR
VALUE "InternalName", "testResources.exe"
VALUE "LegalCopyright", "TODO: (c) . All rights reserved."
VALUE "OriginalFilename", "your_project.exe"
VALUE "ProductName", "TODO: "
VALUE "ProductVersion", PRODUCT_VERSION_STR
END
END
BLOCK "VarFileInfo"
BEGIN
VALUE "Translation", 0x409, 1252
END
END
#endif // Neutral resources
/////////////////////////////////////////////////////////////////////////////
  • Edit “040904e4” block code with same data as if we should edit in a resources editor and use the version.h‘s file defined constants. As you can see in my example, for the FileVersion and ProductVersion properties I use my version.h constants. These properties will not be edited anymore.
  • Delete “// Version” section from default resource file your_project.rc (including comments – recommended).
  • Insert next lines into your_project.rc file after “3 TEXTINCLUDE BEGIN” and before “#define _AFX_NO_SPLITTER_RESOURCES\r\n“:
\r\n""#include ""res\\your_project.rc2""\r\n""\0"
3 TEXTINCLUDE
BEGIN
"\r\n"
"#include ""res\\your_project.rc2""\r\n"
"\0"
"#define _AFX_NO_SPLITTER_RESOURCES\r\n"
"#define _AFX_NO_OLE_RESOURCES\r\n"
"#define _AFX_NO_TRACKER_RESOURCES\r\n"
"#define _AFX_NO_PROPERTY_RESOURCES\r\n"
"\r\n"
"#if !defined(AFX_RESOURCE_DLL) || defined(AFX_TARG_ENU)\r\n"
"LANGUAGE 9, 1\r\n"
"#pragma code_page(1252)\r\n"
"#include ""res\\your_project.rc2"" // non-Microsoft Visual C++ edited resources\r\n"
"#include ""afxres.rc"" // Standard components\r\n"
"#endif\r\n"
"\0"
END

Don’t forget to edit .rc2 file name with the right file name of your project.

  • In your_project.rc file the section “// Generated from the TEXTINCLUDE 3 resource.” have to contain only next declaration:

#include "res\your_project.rc2"

The rest of the section’s lines have to be deleted.

  • We save both resources files: your_project.rc and your_project.rc2.
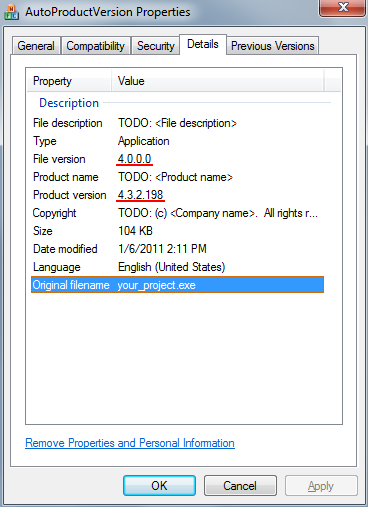
  • Rebuild the project and check the new generated binary properties. In the FileVersion we will have the major version (in my case 4.0.0.0) and in ProductVersion we have the current build version (4.3.2.198).

Demo application - AutoProductVersion (1908 downloads)

Simple Pictures Unifier – first version

Have you just returned from vacation and you have a lot of pictures? You just downloaded your taken pictures and you got your friends pictures, too? Then, probably, the pictures are scattered, with a random order in your computer.
Would you like seeing pictures from all sources in order of events happening?
If so, try to sort your photos using Simple Pictures Unifier tool! 🙂

Simple Pictures Unifier application

Please, feel free to add comments, suggestions or bugs reports to this application.
Any constructive feedback is sincerely appreciated. Thanks you!

File size fast detection

Many times in our job, we need to work with files and need to know file properties.
One of the most important properties is file size. Of course, there are a lot of API that allows finding this property, but most of them needs additional file operations: open file, find file size and close file.

A direct and fast way in order to detect the file size without these operations means the CRT run-time library’s function _tstat64() and stuff.

#define __S_ISTYPE(mode, mask)  (((mode) & _S_IFMT) == (mask))
#define S_ISDIR(mode)    __S_ISTYPE((mode), _S_IFDIR)
Then, write next function:
long long GetFileSizeFast(const TCHAR *szFilePath) {
  if (!szFilePath || !szFilePath[0] || !PathFileExists(szFilePath))
    return -1;

  long long nSize = -1;
  struct __stat64 buf;
  nSize  = (_tstat64( szFilePath, &amp;buf ) == 0) 
           ? buf.st_size : -1;
  if (S_ISDIR(buf.st_mode)) nSize = -1;

  return nSize;
}

If you’re using WinAPI there is an even faster way in order to get file size.

long long GetFileSizeFastest(const TCHAR* szFilePath) {
  if (!szFilePath || !szFilePath[0] || !PathFileExists(szFilePath))
    return -1;

  WIN32_FIND_DATA sFileData;
  HANDLE hFind = FindFirstFile(szFilePath, &amp;sFileData);
  if (hFind == INVALID_HANDLE_VALUE)
    return -1;

  FindClose(hFind);

  return  (sFileData.nFileSizeHigh * (MAXDWORD+1LL)) + sFileData.nFileSizeLow;
}

Finally, call these functions wherever you need.

Hungry boy – Google Chrome 5

My currently default bowser is Google Chrome. I use it more then 90% of my browsing time. I like it because it’s launching so fast, is a secure broswer, respects major W3C standards and has an interesting application architecture. Each tab is an independent process and if appears some troubles in one process, you can stop that process only, without loosing other Chrome’s tabs (processes) data.

Unfortunately, two weeks ago, watching few slides presentations over slideshare.net I was shocked by a Windows message on my laptop (Windows 7 Ultimate x64 OS): “Your computer is low on memory. Save your files and close these programs: Google Chrome.
What the hack?!

Windows special MessageBox

I closed that window and I investigated Task Manager in order to detect witch process was using my memory.
I was socked again when I saw that one Chrome process was using even 701 MB!

huge used memory

Briliant!

Memory graph

The main Google Chrome process had 13 tabs: 8 tabs contained slideshare.net presentations, one with twitter.com and the rest normal web pages.

Release space on a Windows partition – SpaceMonger

Few time ago I observed that my laptop’s first partition (48 GB size) free space reduced to 4 GB.
There are a lot of file managers application (Windows Explorer, Total Commander, Far Manager, etc). All of them provide folder and file lists, but have not intuitive display of most important detail: the size.
Of course, there are some known paths that store not useful data (see bottom folders list) and with each file manager you can delete major not useful data. But, you can miss some old huge file (some forgotten video files, etc).

Fortunately there is a tool witch display folders and files size graphically called SpaceMonger. I used it and now my laptop free space is approximately 20 GB. 🙂 At the end of this process I applied the same story on my old workstation, too.
Using this visual tool is easy to observer big files, folders and is easy to clean Windows temporary files, Windows updates install files, easy to observe hibernate and virtual memory files (if you have enough RAM memory you can disable this feature), etc.
Unfortunately SpaceMonger project development was stopped. Fortunately the free version 1.4 runs fine on Windows 7, even if it was written for Windows 9x OSs.
On my workstation (Windows XP SP3 station with 1792 MB RAM) I observed some troubles when I selected a huge folder in order to delete. SpaceMonger application crushed few times. I recommend individual file delete actions.

If you decide to follow this tutorial for your station is your responsibility. I am not responsible for any damage of your operating system or if you’re loosing your personal data. Do it only if you know what you do. You need a user with administrator rights.
You can download and unzip last freeware SpaceMonger application, 1.4.0 version from:
SpaceMonger v1.4.0 -> Free Software tab -> SpaceMonger v1.4.0 -> Download it! button.

Start running SpaceMonger application. Press Open button, select partition driver and wait partition scanning process. Your scanning results should look like this:

You can see how much free space you have, and all big files and folders. With this tool you can find forgotten huge files, too.
On each Windows partition there are two huge files that can be deleted in some circumstances: hiberfil.sys and pagefile.sys.

Disable hibernate feature – hiberfil.sys
Normally this file is located at C:\hiberfil.sys and file size can vary from 250MB to over 2GB. Trying to delete it it’s not a good idea if you don’t understand what means this file.
This file is used by Windows hibernate. This feature is used instead of shutting down when we need a faster Windows start. Windows takes a snapshot of current operation Windows state, copy everything on this file and turns off most of your hardware. To wake up from hibernation you normally move the mouse or hit the spacebar on the keyboard.
If you are using Windows 7 or Windows Vista, you can easy disable hibernate feature in command prompt window typing powercfg -h off on and press Enter.
If you are sure that you don’t need this feature you can disable it in Windows XP following next steps:
– Go to Control Panel (Start -> Control Panel) and select Power Options feature.
– Click the Hibernate tab, uncheck the ‘Enable hibernate support‘ check box, and then click Apply.
– You need to restart your computer and hiberfil.sys should be automatically deleted.
Later, if you need hibernation feature, you need to go back to Hibernate tab from Power Options and check Enable hibernate support.

Disable virtual memory – pagefile.sys
This file is used by Windows virtual memory extension. Virtual memory is allowing your computer’s operating system pretend that you have more RAM than you actually do and run the Windows application smoother.
Usually this file size is 1.5 times than your actual physical memory size and might consume a huge disk space of your computer hard drive space.
Be carefully if you want to delete disable virtual memory feature. You need to have enough RAM memory.
In order disable virtual memory follow next steps:
– Go to Control Panel and run System.
– Click on Advanced tab and click the Settings button on Performance.
– Click Advanced button and Virtual Memory window appears. Select “No paging file” item and click the Set button if you want to remove pagefile.sys.
– In order to apply these changes you need to restart Windows.

Delete individual files
Using SpaceMonger application you can easy delete temporary file, updates installer files and other huge files. But, BE CARFEFULL WHAT YOU DELETE. Don’t delete Windows files, Program Files files, or other important files.
This application provides zoom in/zoom out features in order to have a complete overview of what you intend to delete.
Some paths that could be deleted are:

  • \Windows\Temp
  • \Documents and Settings\user_name\Local Settings\Temp
  • \Documents and Settings\user_name\Application Data\Microsoft\Office\Recent
  • \Documents and Settings\user_name\Local Settings\Temporary Internet Files
  • \WINNT\TEMP
  • If you are using Windows Vista or Windows 7 and you are tempted to remove \Windows\Winsxs, forget this idea. The Winsxs folder, stores multiple copies of dll’s in order to let multiple applications run in Windows without any compatibility problem. These are actually, different versions of the same files which are being stored; as different programs may require different versions. Winsxs is Win 7 and Vista’s native assembly cache. Libraries which are being by multiple applications are stored there. So, don’t delete WinSxS folder!

    Because many application creates own temporary files, I should recommend to you the running of another nice freeware tool, CCleaner. It’s easy to clean all other temporary data and registry, too.
    You can use SpaceMonger tool on other non-system partition, too.

    Dynamic popup and drop down menus for custom representations

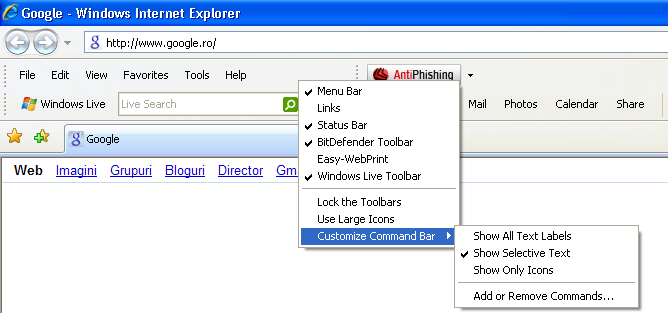
    Many applications allow dynamic customization for visual objects or data views. For instance, well known Internet Explorer application provides toolbars customization using a popup menu that appears when the user execute right click mouse action in toolbar zone area.

    Internet Explorer sample menu

    Other sample where this kind of menu is very useful is when it’s used in order to customize database data representation in Windows controls like List control or grid control. These kind of applications allow data filtering and show/hide columns using this kind of menu. The user just right click on control header and gets what he need.

    Starting from this idea, I implemented a class CDynamicPopupMenu. This class allows an easy building of this kind of menus. I used if in a demo dialog base application over a list control.

    my demo application

    Internally, this class uses a STL container (std::map) with a data structure used in order to embed items menu properties. When the menu is built, menu’s behavior is implemented using these properties.

    Add new menu item
    The new item add menu method has next definition:

    void AddItemData(const int item_id, const int parent_id,
    bool is_visible, bool check_flag, bool has_child,
    const std::wstring item_name, bool enable_flag);

    where:

    • item_id – represents internal item ID; the ID is used for menu customization, too;
    • parent_id – parent item ID used when we define a new items sub-group (a drop-down menu); the attribute value is 0 if menu item is a part of initial menu;
    • is_visible – this flag is used a item is checked / unchecked. In my demo application this flag is set true for all list control’s columns that we want to display. For “Select All” and “Check All” items this flag is false because we want to create new subgroup that contains new columns, but we don’t have “Select All” or “Check All” columns.
    • check_flag – this flag allow check/uncheck menu property;
    • has_child – if is true allows a subgroup definition (a new drop-down menu);
    • item_name – unicode menu item name;
    • enable_flag – defines if the item is enable or disable.

    Add separator item
    Add separator item method definition looks like this:

    void AddItemSeparator(const int item_id, const int parent_id);
    

    where:

    • item_id – menu item ID;
    • parent_id – parent item ID from the subgroup has started; the attribute value is 0 if menu item is a part of initial menu.

    Menu add items sample
    In my demo application, in CtestPopupMenuDlg::SetDefaultMapValues(void) method, among other things, you can find next calls:

    m_pCustPPMenu->AddItemData(MI_MAINITEM_1, 0, true, true, false,
                               _T("Item 1"), true);
    m_pCustPPMenu->AddItemSeparator(MI_MAIN_SEP1,0);
    m_pCustPPMenu->AddItemData(MI_MAINITEM_4_GROUP_1, 0, true, true, true, 
                               _T("Group 1"), true);
    m_pCustPPMenu->AddItemData(MI_GROUP_1_SUBITEM_1, MI_MAINITEM_4_GROUP_1,
    false, false, 
                               false, _T("G1-Select All"), true);
    m_pCustPPMenu->AddItemData(MI_GROUP_1_SUBITEM_2, MI_MAINITEM_4_GROUP_1,
    true, false, 
                               false, _T("G1-Item 12"), true);

    Get menu internal data
    In order to access the internal data container (std::map) that stores all dynamic menu items you just can use next method:

    DynamicMenuData* GetMenuData();

    followed by:

    DynamicMenuData* pItemsMap = m_pCustPPMenu->GetMenuData();

    Create and display menu
    Menu creation must be done just after we add all menu items. The menu is displayed only after TrackPopupCustomMenu() call. The definition of this method looks like this:

    DWORD TrackPopupCustomMenu(POINT point, HWND hWnd);

    where:

    • point – mouse coordinates where the menu start building;
    • hWnd – parrent window handle where the menu is created.

    Function’s return value is the menu IDs that was selected. If no item was selected the function returns 0.
    In my demo application, menus creation is called on list control right-click method (NM_RCLICK).

    void CtestPopupMenuDlg::OnNMRclickList1(NMHDR *pNMHDR, LRESULT *pResult)
    {
      POINT point;
      ::GetCursorPos(&point);
    
      int nSelItem = m_pCustPPMenu->TrackPopupCustomMenu(point, m_ctrlList.m_hWnd);
    
      if (0 < nSelItem) {
       pNMHDR->hwndFrom = m_ctrlList.m_hWnd;
       pNMHDR->idFrom = nSelItem;
       pNMHDR->code = WM_NOTIFY;
    
       OnNotify( 0, (LPARAM)pNMHDR, pResult);
      }
    
      *pResult = 0;
    }

    As you can see, I’m calling TrackPopupCostumMenu(), using mouse point property when the user right-click over list control.
    I am saving list control handler, selected item ID and WM_NOTIFY value into a pointer to message notification structure NMHDR. Then I’m passing this pointer to OnNotify() method.
    Using WM_NOTIFY message and OnNotify() method, I inform parent control window that a new event was generated.

    BOOL CtestPopupMenuDlg::OnNotify(WPARAM wParam, LPARAM lParam, LRESULT* pResult)
    {
      NMHDR *p = (NMHDR*) lParam;
      _ASSERT(p);
      _ASSERT(m_pCustPPMenu);
      bool bFlag = false;
    
      switch (p->idFrom)
      {
        case MI_MAINITEM_1:
        m_pCustPPMenu->GetItemCheckedFlag(MI_MAINITEM_1, bFlag);
        m_pCustPPMenu->SetCheckedItemFlag(MI_MAINITEM_1, !bFlag);
        FillData();
        break;
        
        case MI_MAINITEM_2:
        m_pCustPPMenu->GetItemCheckedFlag(MI_MAINITEM_2, bFlag);
        m_pCustPPMenu->SetCheckedItemFlag(MI_MAINITEM_2, !bFlag);
        FillData();
        break;
    
       // =======================
       // Silviu: this method store other menu items handlers, too
       // =======================
    
       default:
       break;
      }
    
      return CDialog::OnNotify(wParam, lParam, pResult);
    }

    I am calling GetItemCheckedFlag() if order to detect selected item check status (check / uncheck). Then, if item state means check I apply negation over this bool flag and I’m calling SetCheckedItemFlag() method. Finnaly this method produce changes in my control list, depending on my menu command (FillData() method).

    Menu interaction with parent window (list control)
    In my demo application, the interaction between dynamic menu and list control to be treated by FillData() method.
    In order to use CDynamicPopupMenu’s internal container data is need to initialize a DynamicMenuData pointer with GetDynamicMenuData()’s returned value.

    void CtestPopupMenuDlg::FillData()
    {
      _ASSERT(m_pCustPPMenu);
    
      DynamicMenuData *pItemsMap = m_pCustPPMenu->GetDynamicMenuData();
    
      int nCol = 0;
      if ((NULL != pItemsMap) && (!pItemsMap->empty()))
      {
        // reset columns
        int nColumnCount = m_ctrlList.GetHeaderCtrl()->GetItemCount();
        for (int i=0;i < nColumnCount;i++) 
          m_ctrlList.DeleteColumn(0);
    
        for (iterDynMenu itm = pItemsMap->begin(); itm != pItemsMap->end(); ++itm)
        {
          if (m_pCustPPMenu->GetIsVisible(itm) && m_pCustPPMenu->GetIsChecked(itm))
          {
             m_ctrlList.InsertColumn(nCol++, itm->second.sItemName.c_str(), LVCFMT_LEFT, 70);
          }
        }
      }
    }

    Using that pointer to internal menu data, I iterate over internal container, and for those items that are visible and selected set on true I insert columns in my list control.
    Similarly, when using such menus, the application can apply filters on real data.
    CDynamicPopupMenu class contains other useful methods. This kind of menu can be used in different situations in order to change application’s behavior.

    Download demo application: testPopupMenu (Visual C++ 2005 project)

    Versionable Object’s Serialization in MDI applications

    This article represents a follow-up of the last article, “Versionable Object’s Serialization using MFC in non Document View applications”. In that article I presented to you a way to solve incompatibility issues between different file versions of the same application, based on MFC serialization into a dialog base application.
    But, the dialog base applications are not the best way to use and apply MFC serialization.
    Applications base on document view architecture (MDI or SDI) are the best solution when we want to develop MFC application with serialization support.
    Document View MFC architecture offers support for automatic save and load document to/from a file on a storage area, using a serialization mechanism. MDI (Multiple Document Interface) and SDI (Single Document Interface) application offers default serialization basic mechanism.

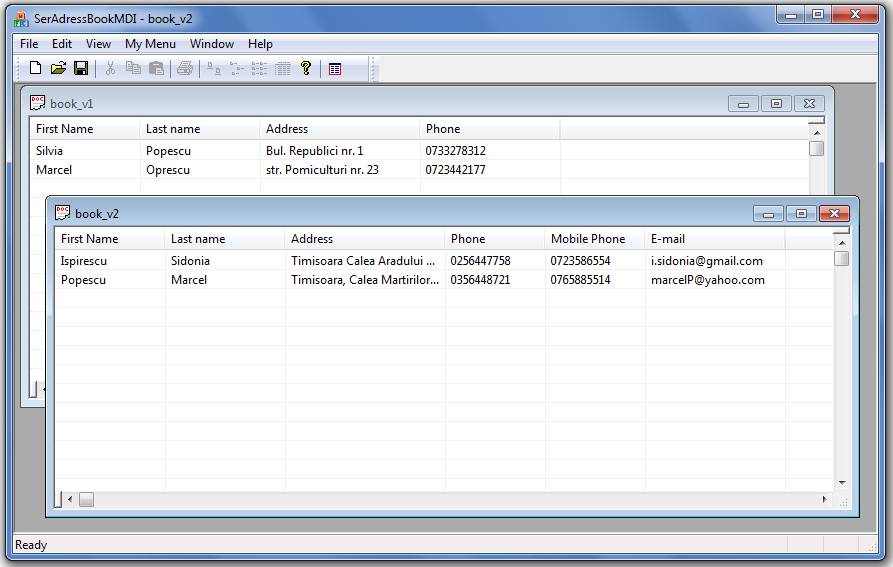
    SerAddressBookMDI Main Window

    The serialization is customizable. It’s important to define the right binary elements format, file version and element count. Finally, we have to complete the serialize method.
    Into a document view application some document class’s methods are mapped over New, Open, Save and Save As items, available in File menu. The application’s user can use these commands in order to create or open files, tracking document status changes and serialize data to/from a file.
    MDI applications create a CDocument derived class instance for each open document. SDI applications reuse the same single CDocument derived class instance for each open file.
    In a MDI application CDocument class and the classes derived from this are responsible with internal objects serialization control. This class tracks each change that appears in our document. In this way, our application knows that some changes have been made when we accidentally want to close the application, without saving last changed data.
    When a document is loaded, a CArchive instance is created for reading file internal data. When we create a new document, a CArchive store instance is created and this instance is used for store to a file process.
    CArchive routines are strongly optimized in order to provide a viable store/load mechanism, even if we are serializing a huge number of small items.

    In my demo application, I used the same idea as in my last article: an address book with two versions.

    In current application the serialization process it’s very different then the old application. The serialization process is realized by a CDocument class instance that interaction with the rest application classes. CAddressBook class place was taken by the document class CSerAddressBookMDIDoc.

    In a real application it’s recommended to use unique identifier (UID) in order to “detect” the right object. For simplicity, in my demo application this unique identifier was defined “name” attribute. For instance, I’m using it for a contact update process.

    Document class – CSerAddressBookMDIDoc

    The interface of document class looks like this:

    class CSerAddressBookMDIDoc : public CDocument
    {
      protected: // create from serialization only
      CSerAddressBookMDIDoc();
      DECLARE_DYNCREATE(CSerAddressBookMDIDoc)
    
      // Attributes
      public:
    
      // Operations
      public:
    
      // Overrides
      public:
      virtual BOOL OnNewDocument();
      virtual void Serialize(CArchive& ar);
    
      void SetFileVersion(UINT nFV) { m_nFileVersionSchema = nFV; }
      UINT GetFileVersion() const { return m_nFileVersionSchema; }
    
      const ContactList& GetContacts() const {return m_cContactsList;}
      bool AddContact(const Contact& contact);
      bool RemoveContact(const CString& firstname, const CString& lastname);
      POSITION FindContact(const CString& firstname) const;
      bool FindContact(const CString& firstname, Contact& contact) const;
      bool UpdateContact(const CString& firstname, Contact& contact);
    
      // Implementation
      public:
      virtual ~CSerAddressBookMDIDoc();
      BOOL DoSave(LPCTSTR lpszPathName, BOOL bReplace); // need to override this
      virtual BOOL OnSaveDocument(LPCTSTR lpszPathName);
    
      #ifdef _DEBUG
      virtual void AssertValid() const;
      virtual void Dump(CDumpContext& dc) const;
      #endif
    
      ContactList m_cContactsList;
    
      // Generated message map functions
      protected:
      DECLARE_MESSAGE_MAP()
    
      private:
      INT m_nFileVersionSchema;
    };

    As you can see, this time I’m using DECLARE_DYNCREATE() macro. This macro allows dynamic document objects runtime creation (a MDI application’s requirement).
    In this class I reused some CAddressBook’s methods. These methods handle objects from m_cContactsList list.
    ContactList is an alias for our Contacts MFC list:
    [cpp]typedef CList ContactList;[/cpp]

    The serialization data method of this document class is listed down:

    void CSerAddressBookMDIDoc::Serialize(CArchive& ar)
    {
      if (ar.IsStoring()) // storing
      {
        ar << m_nFileVersionSchema; // write the number of contacts
        ar << (int)m_cContactsList.GetCount(); 
        Contact::SetCurrentContactVersion(m_nFileVersionSchema); // write all the contacts 
        POSITION pos = m_cContactsList.GetHeadPosition(); 
        while(pos != NULL)
        { 
          Contact contact = m_cContactsList.GetNext(pos);
          contact.Serialize(ar); 
        } 
      } else { // loading
        ar >> m_nFileVersionSchema;
    
        m_cContactsList.RemoveAll();
    
        int count = 0;
        ar >> count;
    
        // read the number of contacts
        while (count-- > 0)
        {
          Contact contact;
          contact.Serialize(ar);
    
          m_cContactsList.AddTail(contact);
        }
      }
      
      UpdateAllViews(NULL);
    }

    This method read (load) or write (store) serialized Contact class’s object using a CArchive object at runtime. If the code flow runs over true branch all information is saving from our list to our file. If code flow choose else branch it means that we are loading an existing file and all file data is loaded in our list.

    In order to store data in a file, initially I save file version (m_nFileVersionSchema) and items count. Then I iterate over all m_cContactsList items (Contact type item) and I serialize this data in order to store in my new file.

    If I want to load data from a file, I am reading file version, I clean my list, I get Contact stored items count and as long as this count variable value is positive I serialized with load flag all Contact file data.
    All serialized Contact entities go to m_cContactsList list. Each time we want to display our files data we have to iterate over this list.

    Internal serialized class – Contact

    As you have seen, in CSerAddressBookMDIDoc::Serialize() method, for both situations (store/load) a new Contact instance is created and this object is passed to Contact::Serialize() for load/store operation.
    The serializing Contact items method looks like this:

    void Contact::Serialize( CArchive& ar )
    {
      if (ar.IsStoring())
      {
        CRuntimeClass* pruntime = Contact::GetRuntimeClass();
        int oldnr = pruntime->m_wSchema;
        pruntime->m_wSchema = CURRENT_VERSION;
    
        ar.SerializeClass(pruntime);
    
        switch (CURRENT_VERSION)
        {
         case 1:
           ar << m_strFirstName << m_strLastName << m_strAddress << m_strPhone; 
         break; 
         case 2:
           ar << m_strFirstName << m_strLastName << m_strAddress << m_strPhone << m_strMobilePhone << m_strEmail; break;
         default: // unknown version for this object 
           AfxMessageBox(_T("Unknown file version."), MB_ICONSTOP);
          break; 
        }
        
        pruntime->m_wSchema = oldnr;
      } else // loading code
        {
        ar.SerializeClass(RUNTIME_CLASS(Contact));
    
        UINT nVersion = ar.GetObjectSchema();
    
        switch (nVersion)
        {
        case 1:
          ar >> m_strFirstName >> m_strLastName >> m_strAddress >> m_strPhone;
          m_strMobilePhone = _T("");
          m_strEmail = _T("");
        break;
    
        case 2:
          ar >> m_strFirstName >> m_strLastName >> m_strAddress >> m_strPhone >> m_strMobilePhone >> m_strEmail;
          break;
    
        default:
         // unknown version for this object
         AfxThrowArchiveException(CArchiveException::badSchema);
         break;
        }
      }
    }

    If I want to store my data to a file, I obtain a runtime pointer to my serialized class, in order to set my file version schema. Then, depending on file version I serialize right object data and finally I reassign initial version schema value of my runtime class.

    If I am loading a file, I call Contact::Serialize() method, I get file version schema and depending on schema value, I add right data to my document class.

    View class – CSerAddressBookMDIView
    This class is responsible with document class content (loaded file’s data) graphical representation. In my demo application, the view class is derived from CListView and has REPORT flag set in order to display data into a grid like.

    Main responsible method with client window’s list control population is CSerAddressBookMDIView::PopulateList() and is listed down:

    void CSerAddressBookMDIView::PopulateList()
    {
      CSerAddressBookMDIDoc* pDoc = GetDocument();
      ASSERT_VALID(pDoc);
    
      CreateViews(pDoc->GetFileVersion());
    
      CListCtrl *pListCtrl = &GetListCtrl();
      ASSERT_VALID(pListCtrl);
    
      // get a reference to the contacts list
      const ContactList& contacts = pDoc->GetContacts();
    
      // iterate over all contacts add add them to the list
      int nCurrentItem = 0;
      POSITION pos = contacts.GetHeadPosition();
      while(pos != NULL)
      {
        const Contact contact = contacts.GetNext(pos);
    
        nCurrentItem = pListCtrl->InsertItem(nCurrentItem, contact.GetFirstName());
        pListCtrl->SetItemText(nCurrentItem, 1, contact.GetLastName());
        pListCtrl->SetItemText(nCurrentItem, 2, contact.GetAddress());
        pListCtrl->SetItemText(nCurrentItem, 3, contact.GetPhoneNumber());
    
        switch(pDoc->GetFileVersion())
        {
          case 1:
          break;
          case 2:
          pListCtrl->SetItemText(nCurrentItem, 4, contact.GetMobileNumber());
          pListCtrl->SetItemText(nCurrentItem, 5, contact.GetEmail());
          break;
          default:
          break;
        }
      }
    }

    First, we obtain a pointer to our current document. Then, we call the method that inserts right list control columns, depending on file version (CreateViews() method).
    We obtain a CListView pointer and an object reference to fist contact from contacts list. Then, as long as we have elements, we iterate over list’s elements (in a while() loop) and insert data to our list control.

    PopulateList() method is called from overwrite CSerAddressBookMDIView::OnUpdate() method. OnUpdate() method is called by MFC framework as long as a document is changed.
    The original OnUpdate() method is called by CDocument::UpdateAllViews() and is implemented in CView class.

    In order to add/remove/update records from our documents I created a special dialog, launched from my Menu menu.
    Display modal dialog method is listed down:

    void CSerAddressBookMDIView::OnMymenuChangedata()
    {
      CSerAddressBookMDIDoc *pDoc = GetDocument();
      ASSERT_VALID(pDoc);
    
      CManipulateDataDlg dlg;
    
      dlg.SetAddressDocument(pDoc);
    
      if (IDOK == dlg.DoModal())
      {
        PopulateList();
      }
    }

    Because I have to interact from my dialog window with contacts list of current document, I have to pass the pointer of my document class ( dlg.SetAddressDocument(pDoc) ) to my dialog window class. If the dialog is closed using Exit button (IDOK id) then the view is refilled, using PopulateList() call.

    CManipulateDataDlg class

    This class is responsible with the management of document contact list items. The difference between this dialog class and the dialog class of last article is that this class is not responsible with load/store process. This role was taken by document view architecture.

    Dialog’s control list population method looks like this:

    void CManipulateDataDlg::PopulateList()
    {
      // delete all current members
      m_cList.DeleteAllItems();
    
      // get a reference to the contacts list
      const ContactList& contacts = m_pAddressDoc->GetContacts();
    
      // iterate over all contacts add add them to the list
      int nCurrentItem = 0;
      POSITION pos = contacts.GetHeadPosition();
      while(pos != NULL)
      {
        const Contact contact = contacts.GetNext(pos);
    
        nCurrentItem = m_cList.InsertItem(nCurrentItem, contact.GetFirstName());
        m_cList.SetItemText(nCurrentItem, 1, contact.GetLastName());
        m_cList.SetItemText(nCurrentItem, 2, contact.GetAddress());
        m_cList.SetItemText(nCurrentItem, 3, contact.GetPhoneNumber());
    
        switch(m_pAddressDoc->GetFileVersion())
        {
          case 1:
          break;
          case 2:
          m_cList.SetItemText(nCurrentItem, 4, contact.GetMobileNumber());
          m_cList.SetItemText(nCurrentItem, 5, contact.GetEmail());
          break;
        }
      }
    }

    Each time we clean the contact list we obtain a reference to the beginning of document contacts list. Depending on file version schema (1 or 2), dialog’s controls are customized. Then, we iterate over contact list elements (ContactList) and I insert data into my control list.

    MDI support for many file extension

    Default MDI applications come with only one file support and only one file extension file format.
    Sometimes, our applications need to support different file format and more file extensions. In my demo application is necessary to support two file format and two file version (version 1 (*.sab1) and version 2 (*.sab2)).
    Same time, the application must support old file format conversion to new file format and vice versa.
    You can find multi file support detailed information for document view MFC application to Microsoft KB 141921. Other useful reference you can find here.
    Starting from these references my application support two file format. I figure some important changes that I made into my initialize method, CSerAddressBookMDIApp::InitInstance.

    BOOL CSerAddressBookMDIApp::InitInstance()
    {
      // ----------
      // MFC’s wizard generated code…
      // ----------
      SetRegistryKey(_T("Local AppWizard-Generated Applications"));
      LoadStdProfileSettings(4); // Load standard INI file options (including MRU)
      // Register the application's document templates. Document templates
      // serve as the connection between documents, frame windows and views
    
      m_pDocManager = new CMultiDocManager; // Silviu
    
      CMultiDocTemplate* pDocTemplate;
      pDocTemplate = new CMultiDocTemplate(IDR_SerAddressBookTYPE,
      RUNTIME_CLASS(CSerAddressBookMDIDoc),
      RUNTIME_CLASS(CChildFrame), // custom MDI child frame
      RUNTIME_CLASS(CSerAddressBookMDIView));
      if (!pDocTemplate)
      return FALSE;
      AddDocTemplate(pDocTemplate);
    
      //Silviu
      pDocTemplate = new CMultiDocTemplate(
      IDR_SerAddressBook2TYPE,
      RUNTIME_CLASS(CSerAddressBookMDIDoc),
      RUNTIME_CLASS(CChildFrame), // custom MDI child frame
      RUNTIME_CLASS(CSerAddressBookMDIView));
      if (!pDocTemplate)
      return FALSE;
      AddDocTemplate(pDocTemplate);
    
      //Silviu
      pDocTemplate = new CMultiDocTemplate(
      IDR_SerAddressBook3TYPE,
      RUNTIME_CLASS(CSerAddressBookMDIDoc),
      RUNTIME_CLASS(CChildFrame), // custom MDI child frame
      RUNTIME_CLASS(CSerAddressBookMDIView));
      if (!pDocTemplate)
      return FALSE;
      AddDocTemplate(pDocTemplate);
    
      // create main MDI Frame window
      CMainFrame* pMainFrame = new CMainFrame;
      if (!pMainFrame || !pMainFrame->LoadFrame(IDR_SerAddressBookTYPE))
      {
        delete pMainFrame;
        return FALSE;
      }
    
      // ----------
      // MFC’s wizard generated code…
      // ----------
    
      return TRUE;
    }

    First point that I should mention, after LoadStdProfileSettings() (function written by MFC wizard) call, is the initialization of m_pDocManager attribute (pointer to CDocManager class, used for document template management) with a new object pointer to CMultiDocManager (class defined be me according with Microsoft Knowledge Base 141921). CMultiDocManager class overwrites some methods from CDocManager: CreateNewDocument(), DoPromptFileName(), OnFileNew().

    Then, besides default document application template (with resource ID IDR_SerAddressBookTYPE), I create two new templates for my two different files format.
    All templates are added into my document template list (AddDocTemplate()). Last significant change from InitInstance() means the right frame window (IDR_SerAddressBookTYPE – contains Save and Save As options).

    Conclusion:
    Multiple Document Interface (MDI) architecture is the best for this kind of data container application. MFC framework offers stable and complete support for objects serialization: storing and loading process.
    Many of Microsoft Office applications are based on this architecture.

    Download demo application: SerAddressBookMDI (Visual C++ 2005 project)