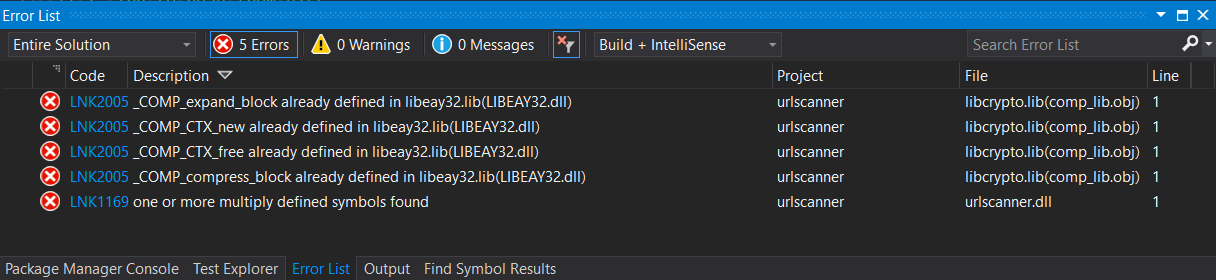
openSSL vs. vcpkg – some strange experiences
Some unexpected experiences caused by the fact the vcpkg C++ package manager is still based on OpenSSL 1.0.2.
Some unexpected experiences caused by the fact the vcpkg C++ package manager is still based on OpenSSL 1.0.2.
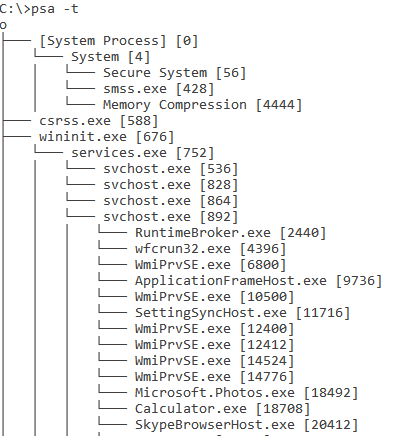
I am pleased to announce my first cross-platform and open source project, the Process Status Analysis tool, available on GitHub.
The Process Status Analysis (psa) is a command line tool that offer some Operating System processes analysis features:
– Get all processes loaded in memory information
– Get process only used memory
– Print processes tree
– Top most “expensive” processes
– Redirect output to a file
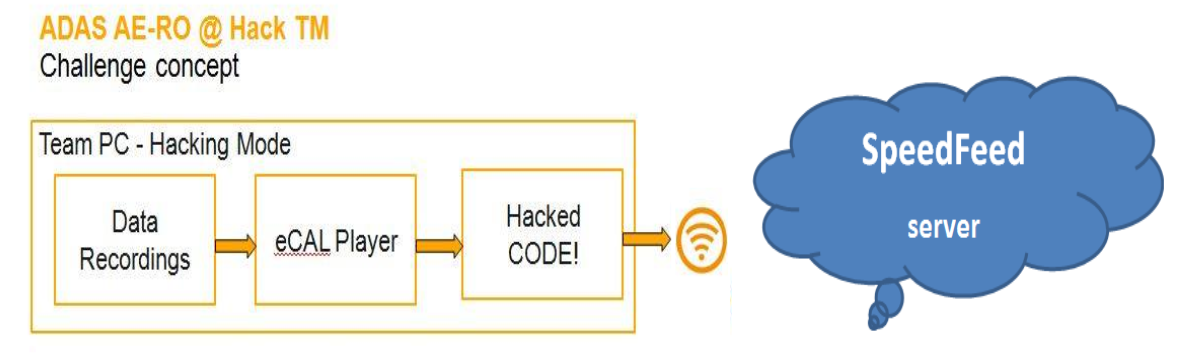
Some inside from my first hackathon experience, the #HackTM2016 from Timisoara.
The title might be as well “When the pathname is not what it has to be”. The experience of developing plugins for Adobe Acrobat/Reader reserved… Read More »The Chameleon Pathnames
I wrote this document after a challenging experience I had recently within an Adobe Acrobat/Reader plugin creation. Even if the Adobe’s SDK it’s nicely documented… Read More »Experiences with Adobe Acrobat/Reader Plug-ins
Trying to get table indexes information in SQL Server 2012 I identified a strange situation within a specific method that I was using so long but it was not acting as expected in one situation.
Usually, I got the right information about indexes but in one situation I encounter a strange behavior. It’s about having a clustered index into a scenario.
I have a table that contains two indexes referenced to some fields: IndexField_1 and IndexField_3 mapped over int, NULL fields. When IndexField_1 is Non-Unique, Non-Clustered and IndexField_3 is Clustered index I get the right information.
But if the index IndexField_1 is Clustered and the IndexField_3 is Non-Unique, Non-Clustered I get no information about IndexField_1 index (eg. szIdxName and szIdxColName are “” and their length is -1 that means SQL_NULL_DATA). Within while loop, with the next iteration I get correct information about the second index IndexField_3.
This short tutorial shows how easy it’s to generate reports in HTML pages using Microsoft XML DOM API together XML and XSLT. XML (Extensible Markup… Read More »HTML files generation using XML and XSLT with Microsoft XML DOM API
As you most probably know, this website uses WordPress. Last Saturday, trying to access the site admin area I was faced with an error generated… Read More »Some experiences with the last world-wide WordPress brute force attack
The Problem Trying to paint a background image into client area of a MDI application build in VC++ 6.0 to VC++ 2005 IDE it’s not… Read More »SubclassWindow() method issues in projects base on MFC Feature Pack
This article offers some insight into singleton design-pattern. The singleton pattern is a design pattern used to implement the mathematical concept of a singleton, by… Read More »Several C++ singleton implementations
Called by the compiler when you have more than one page of local variables in your function.
_chkstk Routine is a helper routine for the C compiler. For x86 compilers, _chkstk Routine is called when the local variables exceed 4K bytes; for x64 compilers it is 8K.
That’s all that you get from _chkstk()’s msdn web page. Nothing more…

A recent Visual C++ team’s comment on twitter.com reminded me a hot topic that exists in C++ programming world: there is a long discussion of using pre versus post increment operators, specially, for iterators. Even me I was witness to a discussion like this. The discussion started from a FAQ written by me on www.codexpert.ro.
Base on that VC++ team’s tweet related to viva64.com’s research I decided to create my own benchmark base on single and multicore architectures. For those that don’t know Viva64 is a company specialized on Static Code Analysis.
Starting from their project I extended the tested for other STL containers: std::vector, std::list, std::map, and std::unordered_map (VC++ 2010 hash table implementation).
For parallel core tests I used Microsoft’s new technology called Parallel Pattern Library.
continue…